Corner Rounding
When it comes to corner rounding, many developers stick with CALayer’s .cornerRadius property. Unfortunately, this convenient property greatly taxes performance and should only be used when there is no alternative. This post will cover:
- why you shouldn’t use CALayer’s .cornerRadius
- more performant corner rounding options and when to use them
- a flow chart for choosing your ideal corner rounding strategy
- Texture corner rounding methods
CALayer’s .cornerRadius is Expensive
Why is .cornerRadius so expensive? Use of CALayer’s .cornerRadius property triggers offscreen rendering to perform the clipping operation on every frame - 60 FPS during scrolling - even if the content in that area isn’t changing! This means that the GPU has to switch contexts on every frame, between compositing the overall frame + additional passes for each use of .cornerRadius.
Importantly, these costs don’t show up in the Time Profiler, because they affect work done by the CoreAnimation Render Server on your app’s behalf. This intensive thrash annihilates performance for a lot of devices. On the iPhone 4, 4S, and 5 / 5C (along with comparable iPads / iPods), expect to see notably degraded performance. On the iPhone 5S and newer, even if you can’t see the impact directly, it will reduce headroom so that it takes less to cause a frame drop.
Performant Corner Rounding Strategies
There are only three things to consider when picking a corner rounding strategy:
- Is there movement underneath the corner?
- Is there movement through the corner?
- Are all 4 corners the same node *and* no other nodes intersect in the corner area?
Movement underneath the corner is any movement behind the corner. For example, as a rounded-corner collection cell scrolls over a background, the background will move underneath and out from under the corners.
To describe movement through the corner, imagine a small rounded-corner scroll view containing a much larger photo. As you zoom and pan the photo inside of the scroll view, the photo will move through the corners of the scroll view.
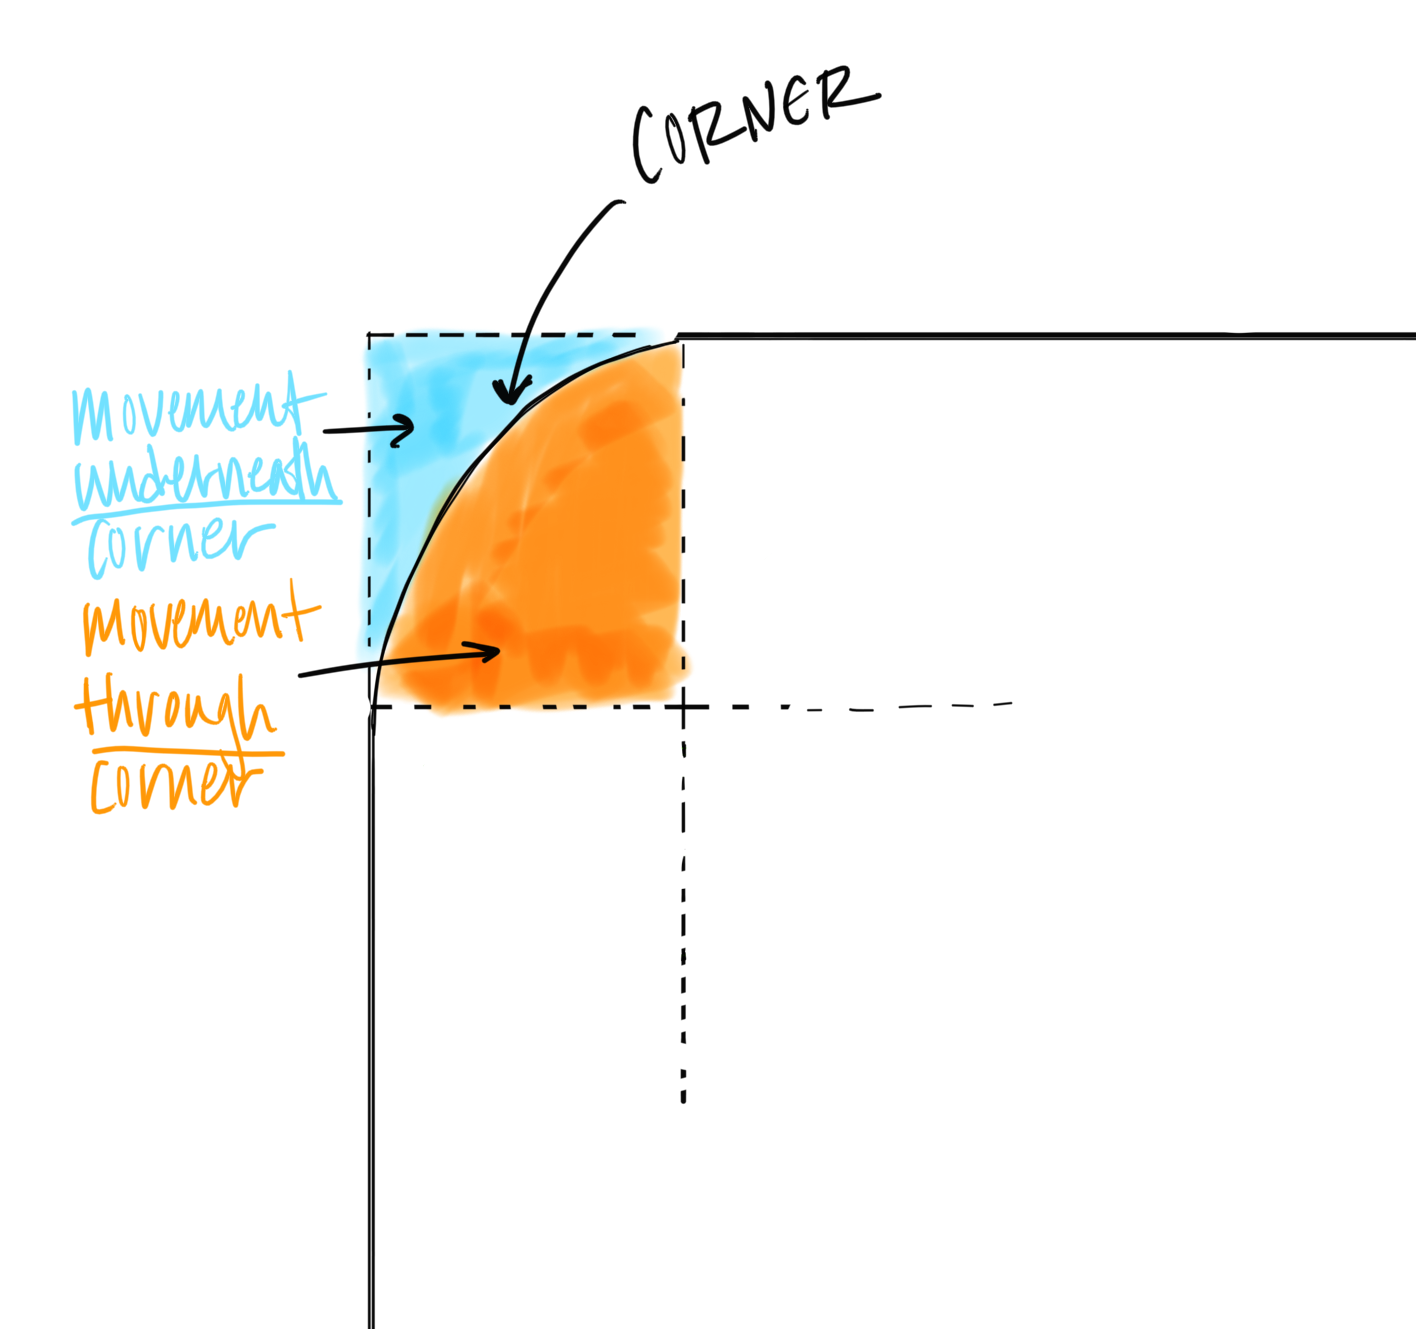
The above image shows movement underneath the corner highlighted in blue and movement through the corner highlighted in orange.
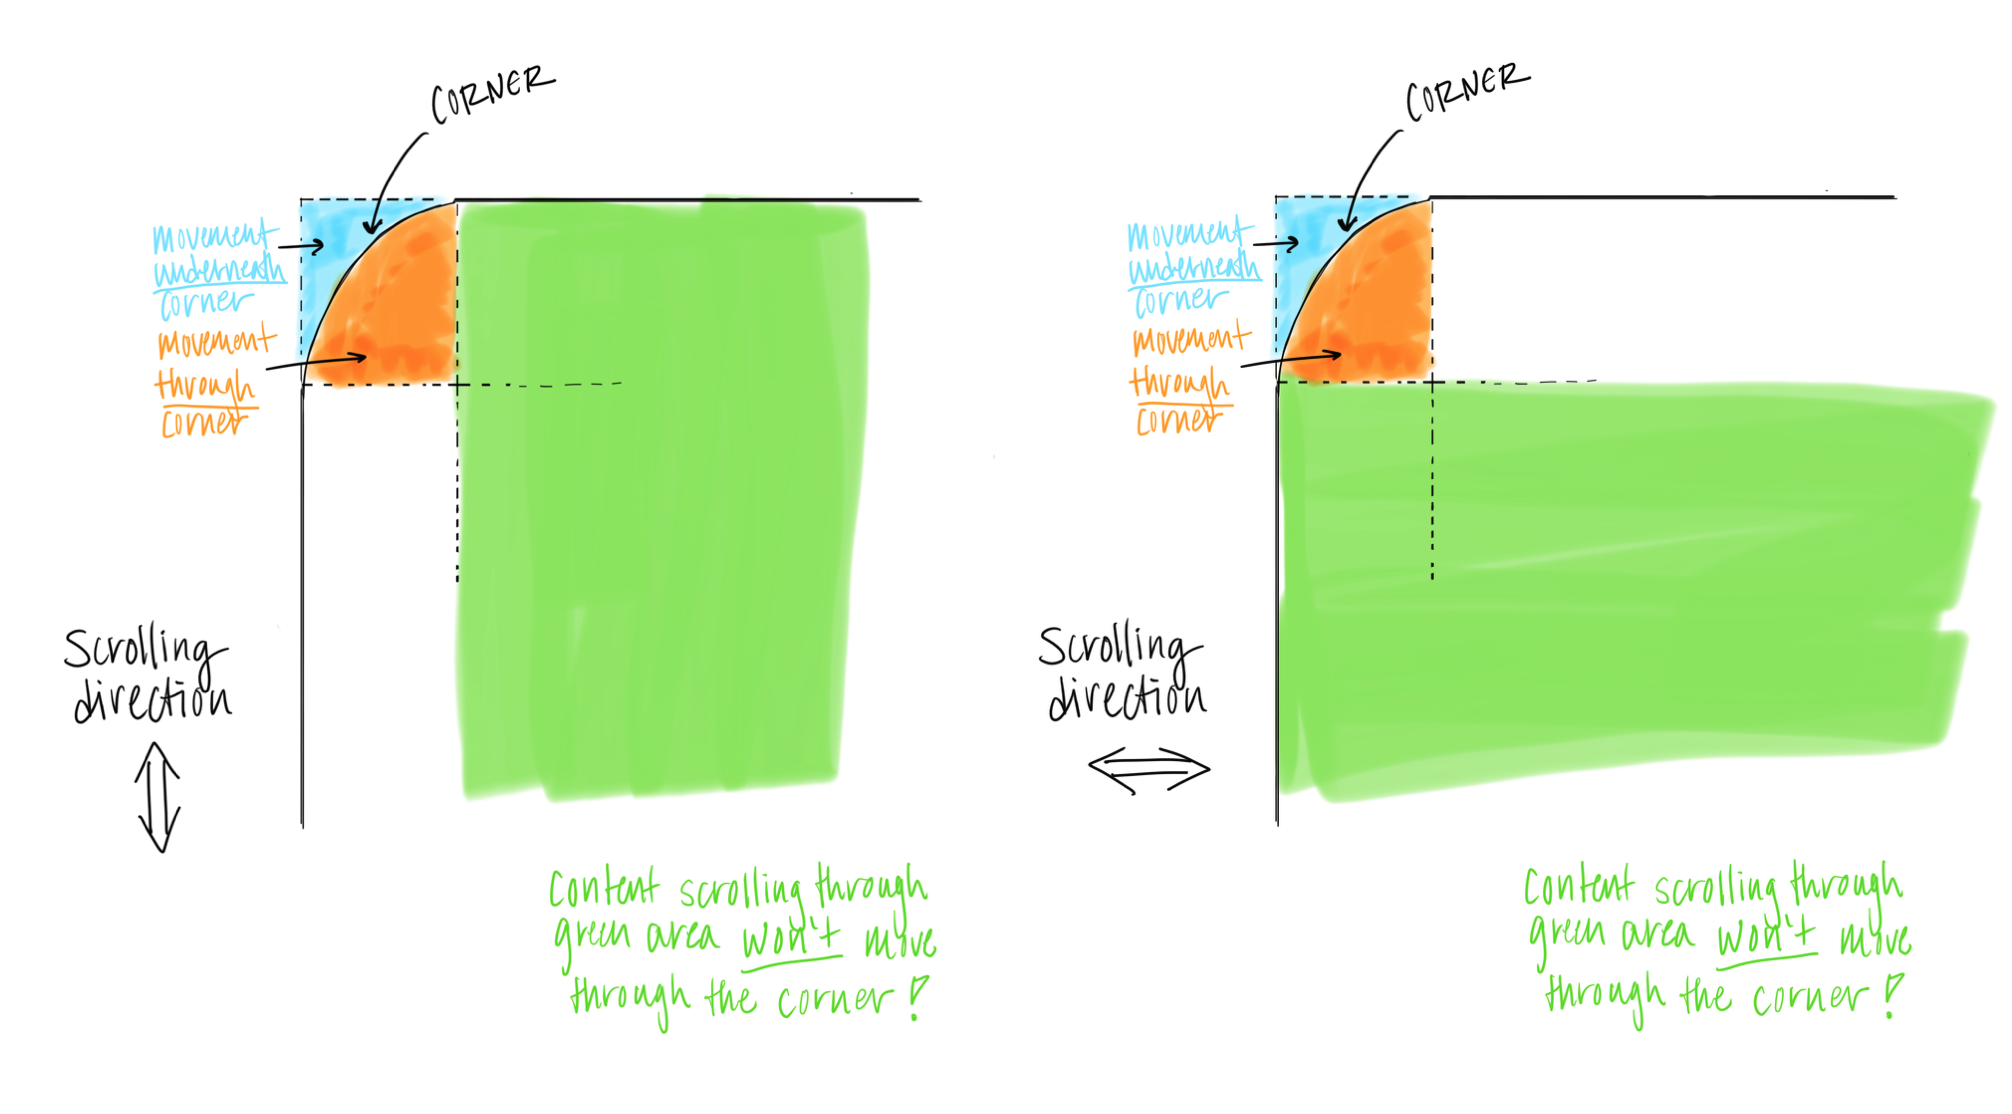
Using the above method to adjust your design to eliminate one source of corner movement can make the difference between being able to use a fast rounding technique, or resorting to .cornerRadius..
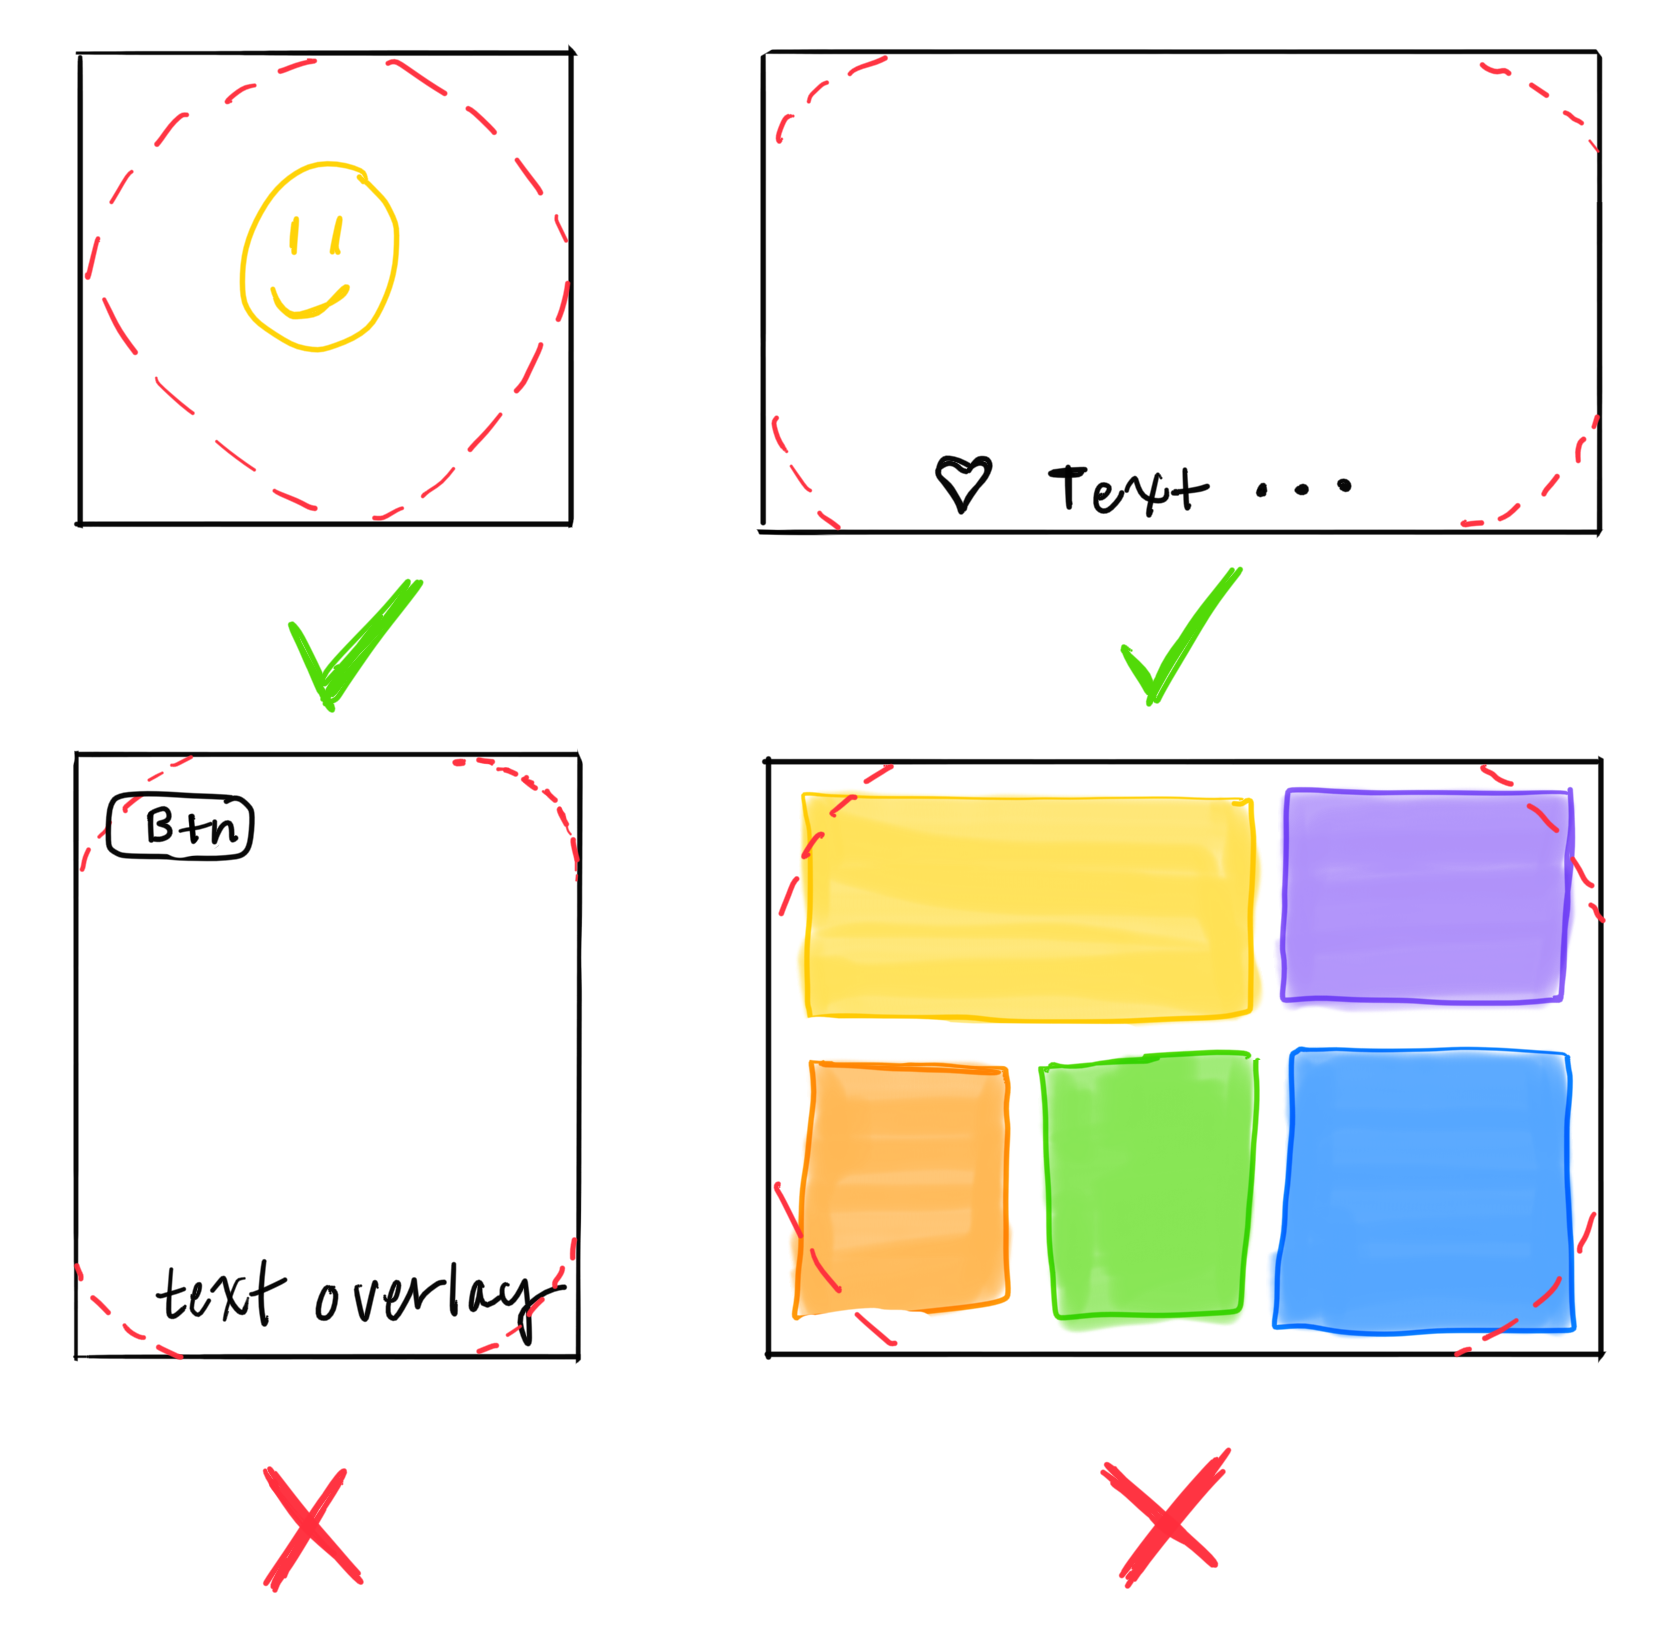
The final consideration is to determine if all four corners cover the same node or if any subnodes interesect the corner area.
Precomposited Corners
Precomposited corners refer to corners drawn using bezier paths to clip the content in a CGContext / UIGraphicsContext ([path clip]). In this scenario, the corners become part of the image itself — and are “baked in” to the single CALayer. There are two types of precomposited corners.
The absolute best method is to use precomposited opaque corners. This is the most efficient method available, resulting in zero alpha blending (although this is much less critical than avoiding offscreen rendering). Unfortunately, this method is also the least flexible; the background behind the corners will need to be a solid color if the rounded image needs to move around on top of it. It’s possible, but tricky to make precomposited corners with a textured or photo background - usually it’s best to use precomposited alpha corners instead.
The second method involves using bezier paths with precomposited alpha corners. This method is pretty flexible and should be one of the most frequently used. It does incur the cost of alpha blending across the full size of the content, and including an alpha channel increases memory impact by 25% over opaque precompositing - but these costs are tiny on modern devices, and a different order of magnitude than .cornerRadius offscreen rendering.
A key limitation of precomposited corners is that the corners must only touch one node and not intersect with any subnodes. If either of these conditions exist, clip corners must be used.
Note that Texture nodes have a special optimization of .cornerRadius that automatically implements precomposited corners only when using .shouldRasterizeDescendants. It’s important to think carefully before you enable rasterization, so don’t use this option without first reading all about the concept.
Clip Corner
This strategy involves placing 4 seperate opaque corners that sit on top of the content that needs corner rounding. This method is flexible and has quite good performance. It has minor CPU overhead of 4 seperate layers, one layer for each corner.

Clip corners applies to two main types of corner rounding situations:
- Rounded corners in situations in which the corners touch more than one node or intersect with any subnodes.
- Rounded corners on top of a stationary texture or photo background. The photo clip corner method is tricky, but useful!
Is it ever okay to use CALayer’s .cornerRadius property?
There are a few, quite rare cases in which it is appropriate to use .cornerRadius. These include when there is dynamic content moving both through the inside and underneath the corner. For certain animations, this is impossible to avoid. However, in many cases, it is easy to adjust your design to eliminate one of the sources of movement. One such case was discussed in the section on corner movement.
It is much less bad, and okay as a shortcut, to use .cornerRadius. for screens in which nothing moves. However, any motion on the screen, even movement that doesn’t involve the corners, will cause the .cornerRadius. performance tax. For example, having a rounded element in the navigation bar with a scrolling view beneath it will cause the impact even if they don’t overlap. Animating anything onscreen, even if the user doesn’t interact, will as well. Additionally, any type of screen refresh will incur the cost of corner rounding.
Rasterization and Layerbacking
Some people have suggested that using CALayer’s .shouldRasterize can improve the performance of the .cornerRadius property. This is not well understood option that is generally perilous. As long as nothing causes it to re-rasterize (no movement, no tap to change color, not on a table view that moves, etc), it is okay to use. Generally we don’t encourage this because it is very easy to cause much worse performance. For people who have not great app architecture and insist on using CALayer’s .cornerRadius (e.g. their app is not very performant), this can make a meaningful difference. However, if you are building your app from the ground up, we highly reccommend that you choose one of the better corner rounding strategies above.
CALayer’s .shouldRasterize is unrelated to Texture node.shouldRasterizeDescendents. When enabled, .shouldRasterizeDescendents will prevent the actual view and layer of the subnode children from being created.
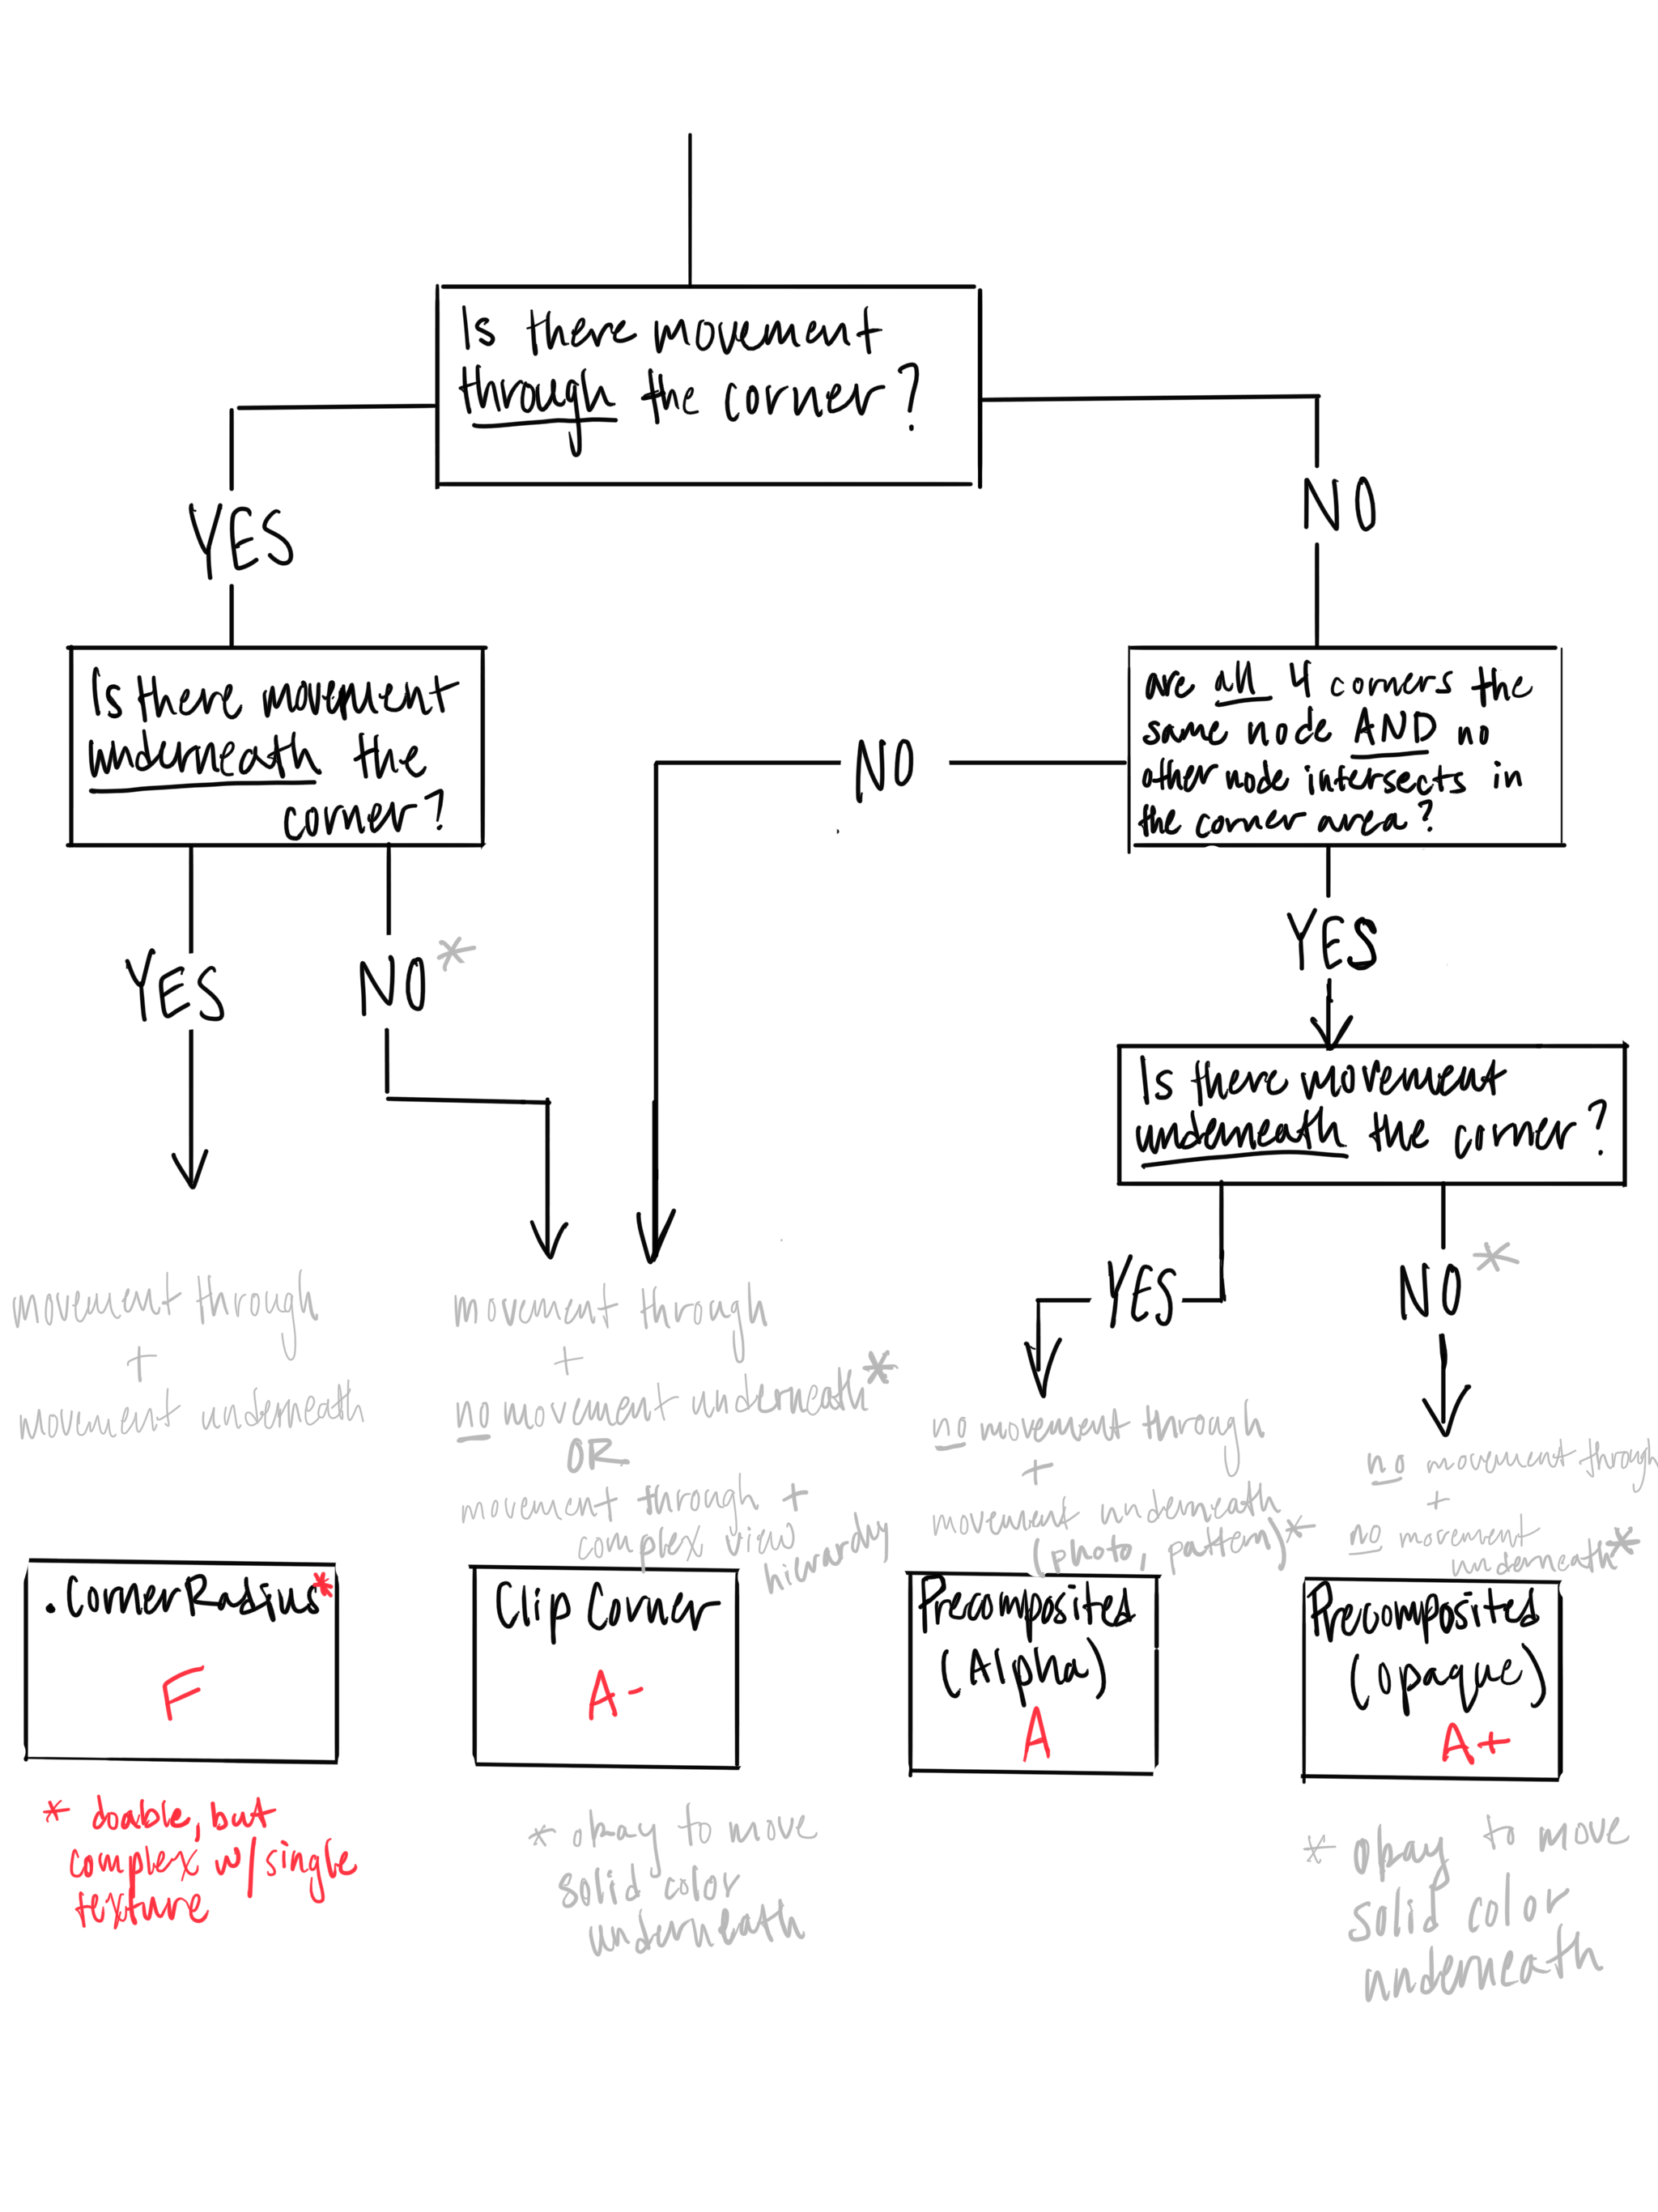
Corner Rounding Strategy Flowchart
Use this flowchart to select the most performant strategy to round a set of corners.
Texture Support
The following code exemplifies different ways how to archive corner rounding within Texture:
Use .cornerRadius
CGFloat cornerRadius = 20.0;

_photoImageNode.cornerRoundingType = ASCornerRoundingTypeDefaultSlowCALayer;
_photoImageNode.cornerRadius = cornerRadius;
Use precomposition for rounding corners
CGFloat cornerRadius = 20.0;

_photoImageNode.cornerRoundingType = ASCornerRoundingTypePrecomposited;
_photoImageNode.cornerRadius = cornerRadius;
Use clipping for rounding corners
CGFloat cornerRadius = 20.0;

_photoImageNode.cornerRoundingType = ASCornerRoundingTypeClipping;
_photoImageNode.backgroundColor = [UIColor whiteColor];
_photoImageNode.cornerRadius = cornerRadius;
Use willDisplayNodeContentWithRenderingContext to set a clipping path for the content for rounding corners
CGFloat cornerRadius = 20.0;

// Use the screen scale for corner radius to respect content scale
CGFloat screenScale = UIScreen.mainScreen.scale;
_photoImageNode.willDisplayNodeContentWithRenderingContext = ^(CGContextRef context, id drawParameters) {
    CGRect bounds = CGContextGetClipBoundingBox(context);
    CGFloat radius = cornerRadius * screenScale;
    UIImage *overlay = [UIImage as_resizableRoundedImageWithCornerRadius:radius
                                                             cornerColor:[UIColor clearColor]
                                                               fillColor:[UIColor clearColor]
                                                               traitCollection:self.primitiveTraitCollection];
    [overlay drawInRect:bounds];
    [[UIBezierPath bezierPathWithRoundedRect:bounds cornerRadius:radius] addClip];
};
Use ASImageNode extras to round the image and add a border.
This is great for example to round avatar images.
CGFloat cornerRadius = 20.0;

_photoImageNode.imageModificationBlock = ASImageNodeRoundBorderModificationBlock(5.0, [UIColor orangeColor]);